How to Implement Keycloak SSO Authentication in Liferay DXP

The article is written by mutual efforts of Vitaliy, Senior Liferay Developer, and Svitlana, Writer.
When your business is growing, the company’s information system consequently expands. At a certain point, it becomes not just a single web site, but a whole ecosystem with a bunch of sub-systems for different purposes. Each of these sub-systems may be dedicated to a specific business branch, they may have different content and different URLs, but they are still part of a single system. Thus, they should have a single user database and a single entry point for any of those systems. Once the user has logged into one system, they should be able to access any other sub-system without a repeated login for their convenience, time-saving, and security. This is where Single Sign-on helps.
In this article, we’ll take step by step Liferay Single Sign-on integration, suggest one of the best tools applicable for this purpose, and unveil the useful tips that may help implement it seamlessly in less than no time. Anyone interested in Liferay portal development, be it a seasoned programmer or someone who takes their first steps in software development, will find the answers to their long-troubling questions of Liferay SSO implementation here.
What is an SSO
Single Sign-on (SSO) is an authentication scheme that allows a user to log in with a single ID and password to any of several related yet independent software systems. Here you can see a workflow of a typical SSO solution:
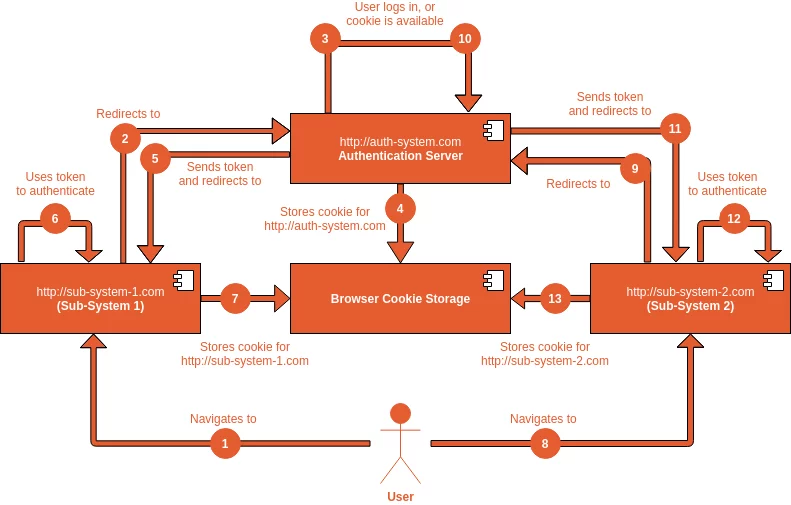
But what stays behind the curtains? How does the scheme work? A user accesses a sub-system and is redirected to the central Authentication Server. They log in there and are redirected back to the sub-system they accessed, being automatically logged in there. Once they access another sub-system, they become automatically logged in as well.
In this case, a user is also redirected to the central authentication server. As they are already logged in there, no additional sign-in is required, so they are redirected back to the original URL, being automatically logged in. But all these actions are performed behind the scene, and a user has a feeling of smooth transitions between different sub-systems with different domains.
SSO benefits. Liferay as an SSO client
SSO provides you with inarguable advantages. Its implementation ensures:
- Better user experience: navigation between connected systems is smooth and clean. Once a user has logged into one system, they don’t need to enter login/password anywhere else.
- Better password management: a user has to remember only one login/password combination. Thus, they can set a stronger password, so there is less risk of forgetting it
- Security: the user’s credentials are stored in a single authentication server, which typically has reliable protection against hacker attacks.
- Resource savings: IT administrators have to maintain only the central authorization server. Developers don’t need to implement authentication in their applications. They just use the authorization server.
But why may we need an SSO implementation in Liferay taking into account it has its own mechanisms of user’s authentication, using the email address, login or user ID?
Well, Liferay is a powerful tool: you can build an intranet on it, or a public website, customer portal, or whatever you need. And, for most cases, Liferay’s built-in authorization system is enough, and it satisfies a broad scope of business needs. But sometimes, the Liferay portal itself can be just a part of a larger web-system, which consists of different connected sub-systems:
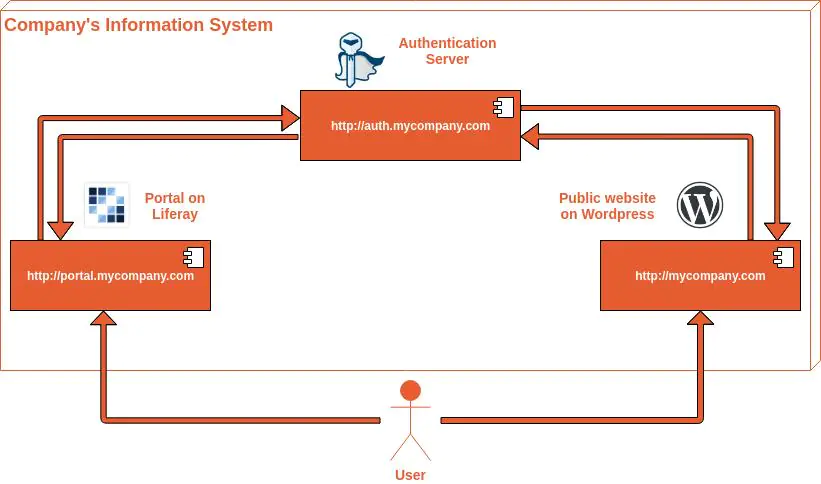
In the example above, the company’s information system consists of the portal, built on Liferay, and a public website, built on WordPress. They both have their own domains, but they use a single authentication server for user authorization. At a certain point, even a new sub-system with a new domain, implemented on a different technology, can be created and integrated using the same authorization server.
But before we dive deep into SSO integration, let’s decide on the tool that will serve as one of the best fits for Single Sign-on implementation in Liferay.
What is Keycloak
Keycloak is an open source software product, which allows Single Sign-on with Identity Management and Access Management for modern applications and services. It’s maintained by RedHat Inc., a huge international software company. Besides SSO, it has a lot of other features: 2-factor authentication, user registration, LDAP integration, social login, etc.
Why use and install Keycloak in Liferay becomes obvious when considering the extensive benefits it can provide:
- Authorization & Authentication: user sign-in to any connected system with only one account;
- Security: user’s personal data are protected and safe;
- Up-to-Date: regular updates and new features releases
- Scalability: can be scaled and adapted to the business needs, no restrictions on users/accounts count
- Open Source: it’s a completely open source product, all code updates are continuously maintained
- Active Community: allows you to get quick and professional answers to possible questions.
Liferay-Keycloak integration
Now, let’s go into technical details of an SSO implementation between Liferay and Keycloak. Keycloak will act as an Authentication Server, while the Liferay portal will be a client application.
Once a user signs in to the portal, they should be redirected to the Keycloak server, where they enter login and password from their Keycloak account. After a successful sign-in, they should be redirected back to the portal and become automatically logged in there.
The following chapters will explain how to make this configuration on the Keycloak and Liferay side. We’ll use the latest versions of Keycloak (9.0.3) and Liferay (7.3.1 CE GA2) available at the moment.
Keycloak side
First of all, download and install Keycloak server from the official website:
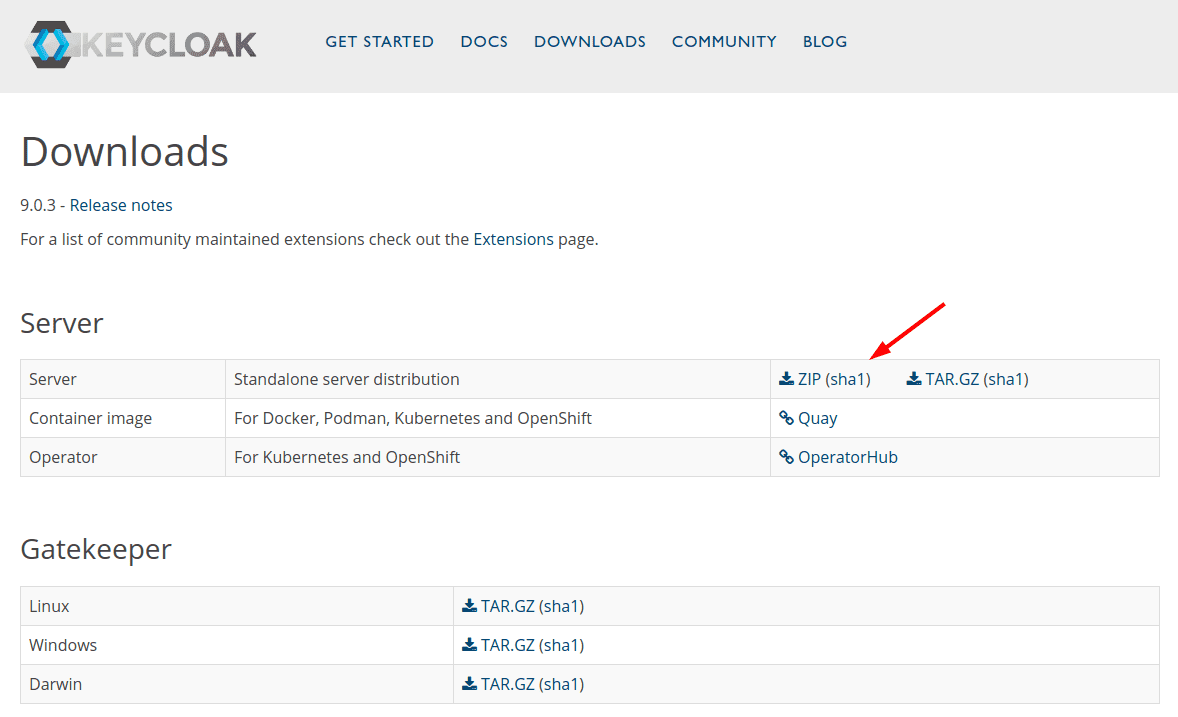
Keycloak is run on 8080 port by default. As Liferay also runs on this port, we need to change it to another one (for example, 8081). Modify the file keycloak-9.0.3/standalone/configuration/standalone.xml file, and change the port-offset value from 0 to 1:

Run Keycloak server with keycloak-9.0.3/bin/standalone.sh command (or standalone.bat). After Keycloak has started, you will see the welcome page:
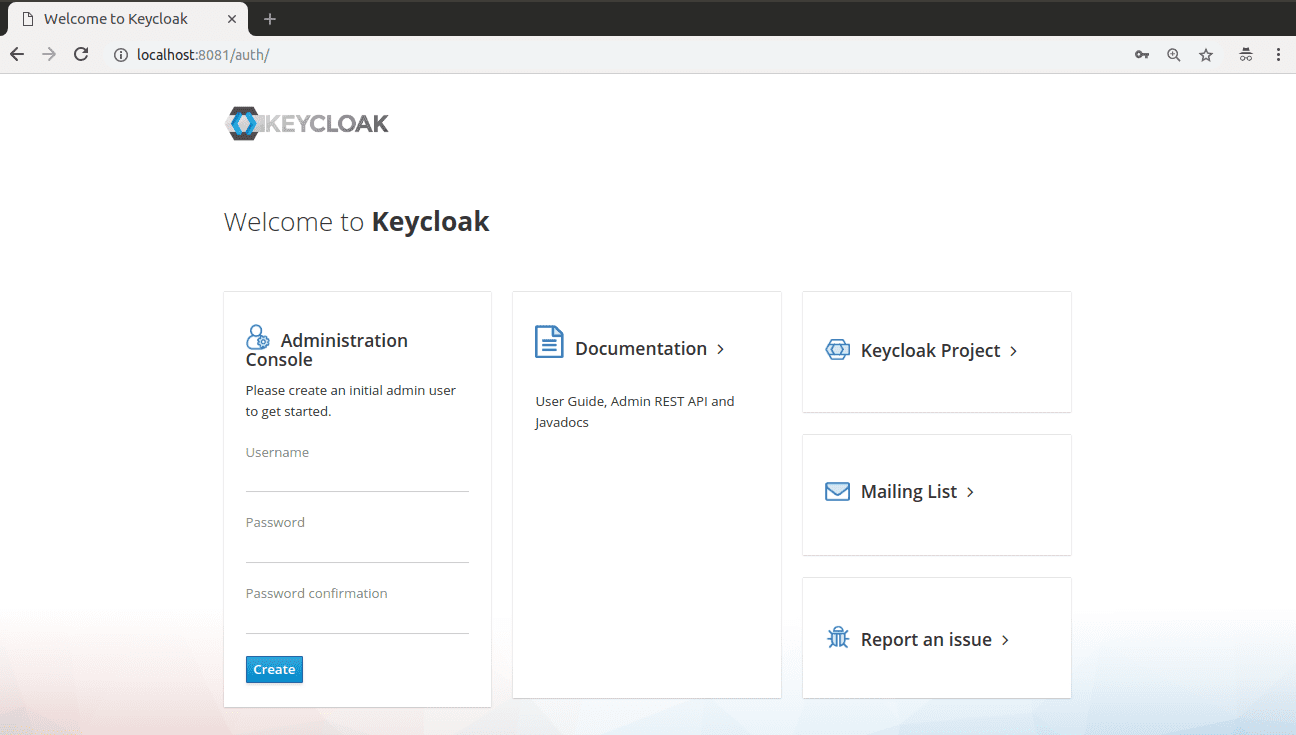
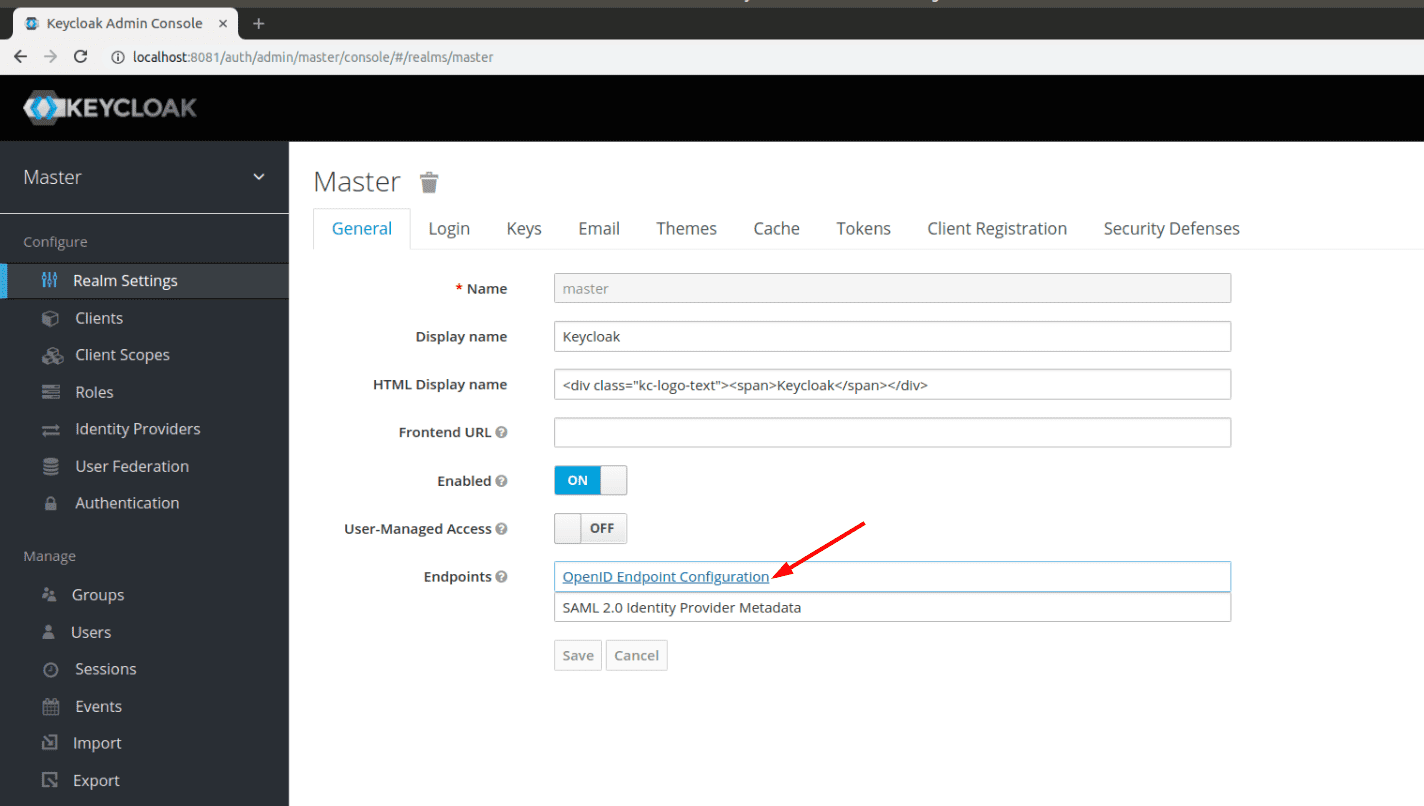
Create the default administrator user and sign in. You should be landed to the Realm Settings page. Click on OpenID Endpoint Configuration link and copy the configuration:
You should see the JSON configuration for OpenID Endpoint, like this:
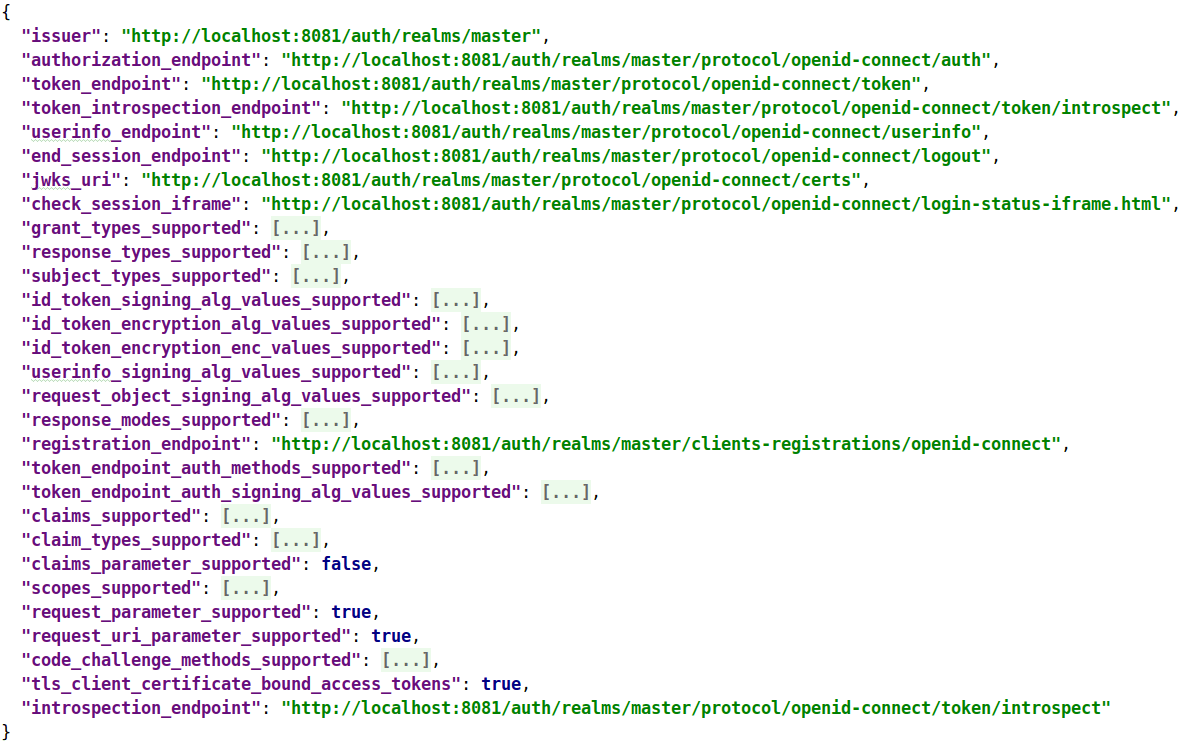
You’ll need some of these values later, during Keycloak and Liferay 7 SSO configuration.
Now it’s time to create a client for OpenID Connect. You should go to Clients and create a new Client:
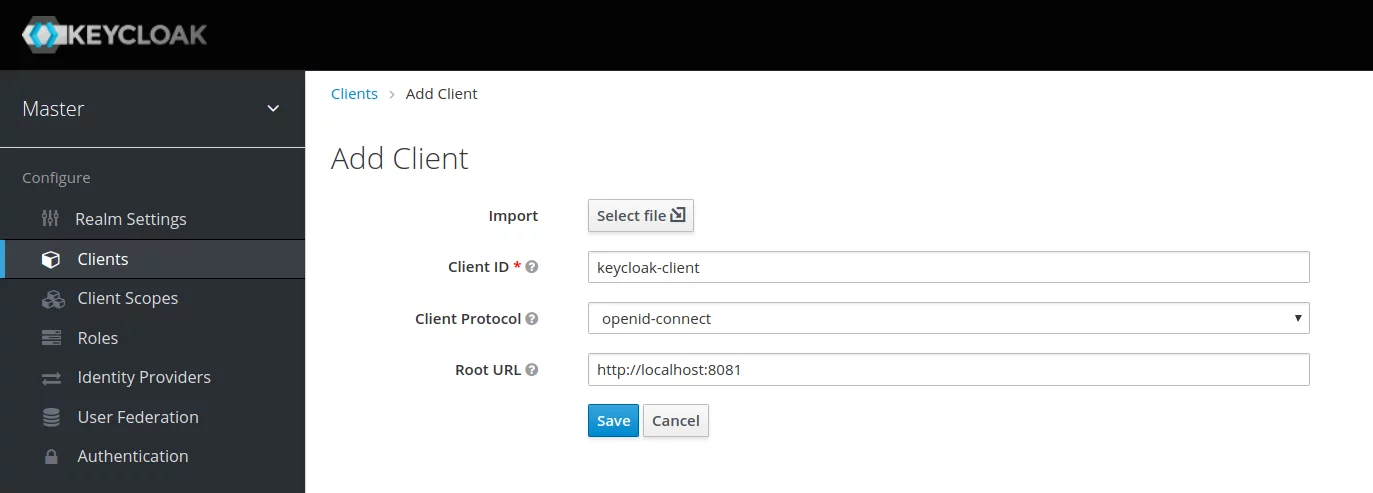
Define a unique Client ID, select openid-connect: as Client Protocol and define the Root URL.
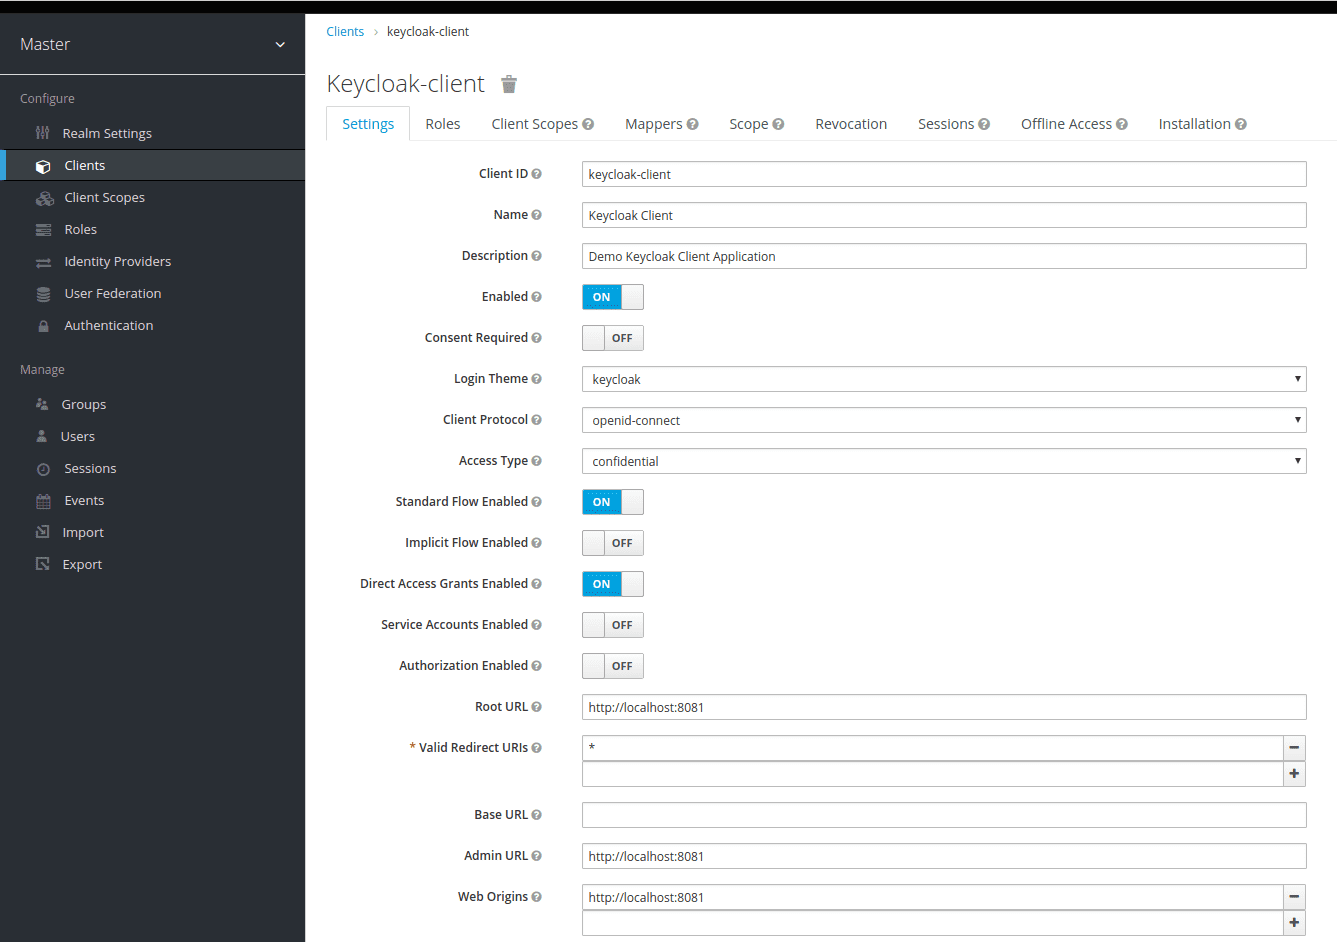
The next step is to save the Client and set the Client configuration:
- Client ID and Name;
- Access Type to confidential;
- Valid Redirect URIs to *.
The following image will appear on your screen:
After that, go to the Credentials tab and copy the client’s secret:
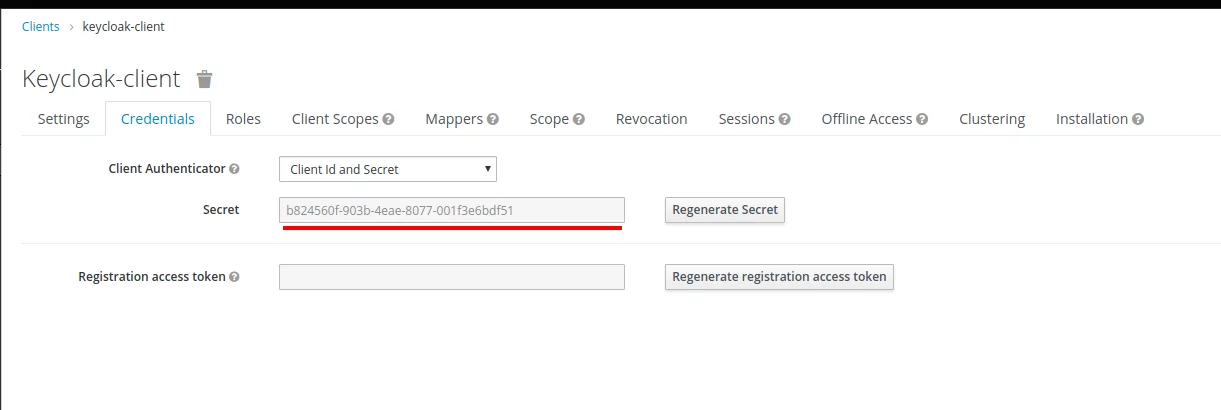
You will also need to create an Identity Provider. Go to the Identity Providers tab and create a new Identity Provider. Select Keycloak OpenID Connect from the list:
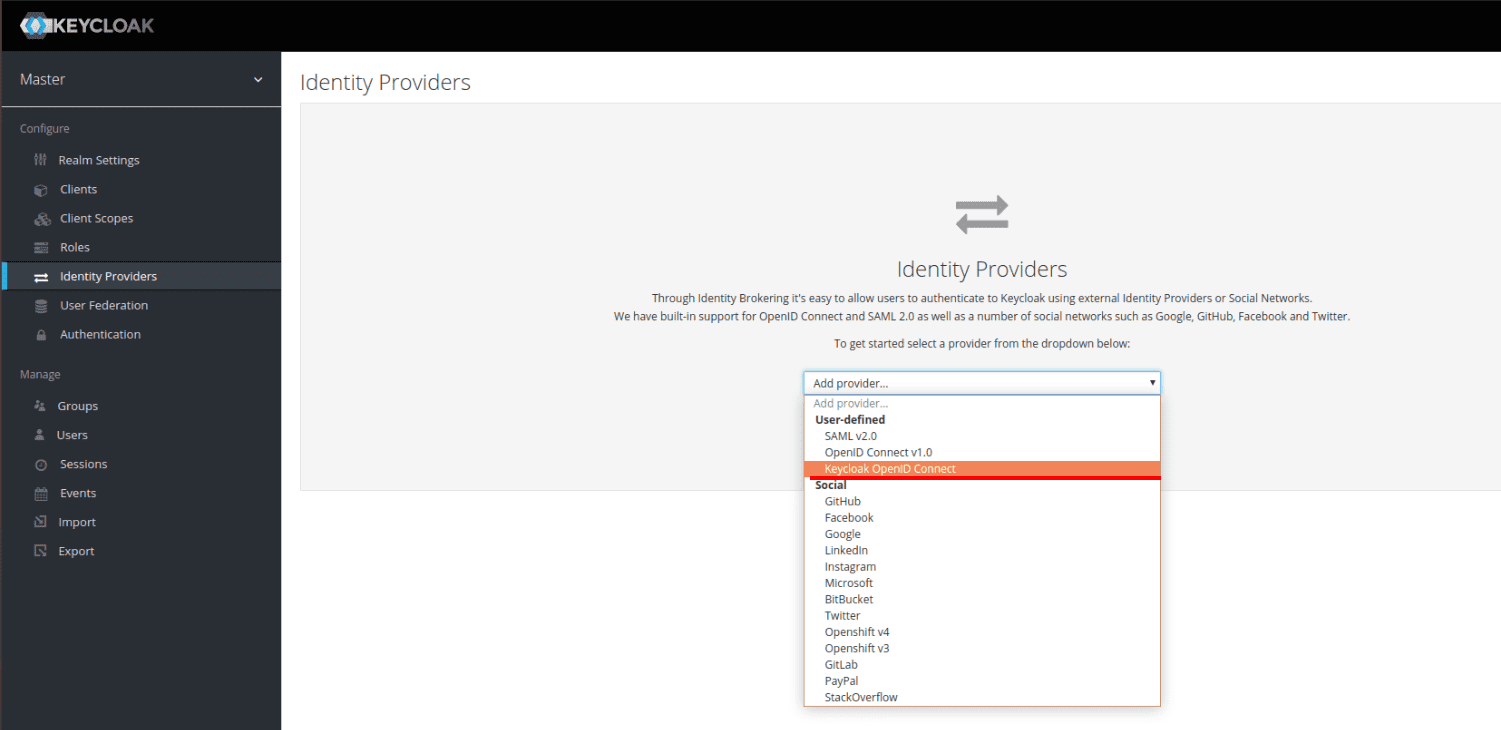
Configure the Identity Provider by:
- Defining a unique Alias for the Identity Provider;
- Setting Authorization URL, Token URL and Logout URL to the values from the OpenID Endpoint Configuration above;
- Setting Client ID and Secret to the values from the client’s configuration created above.
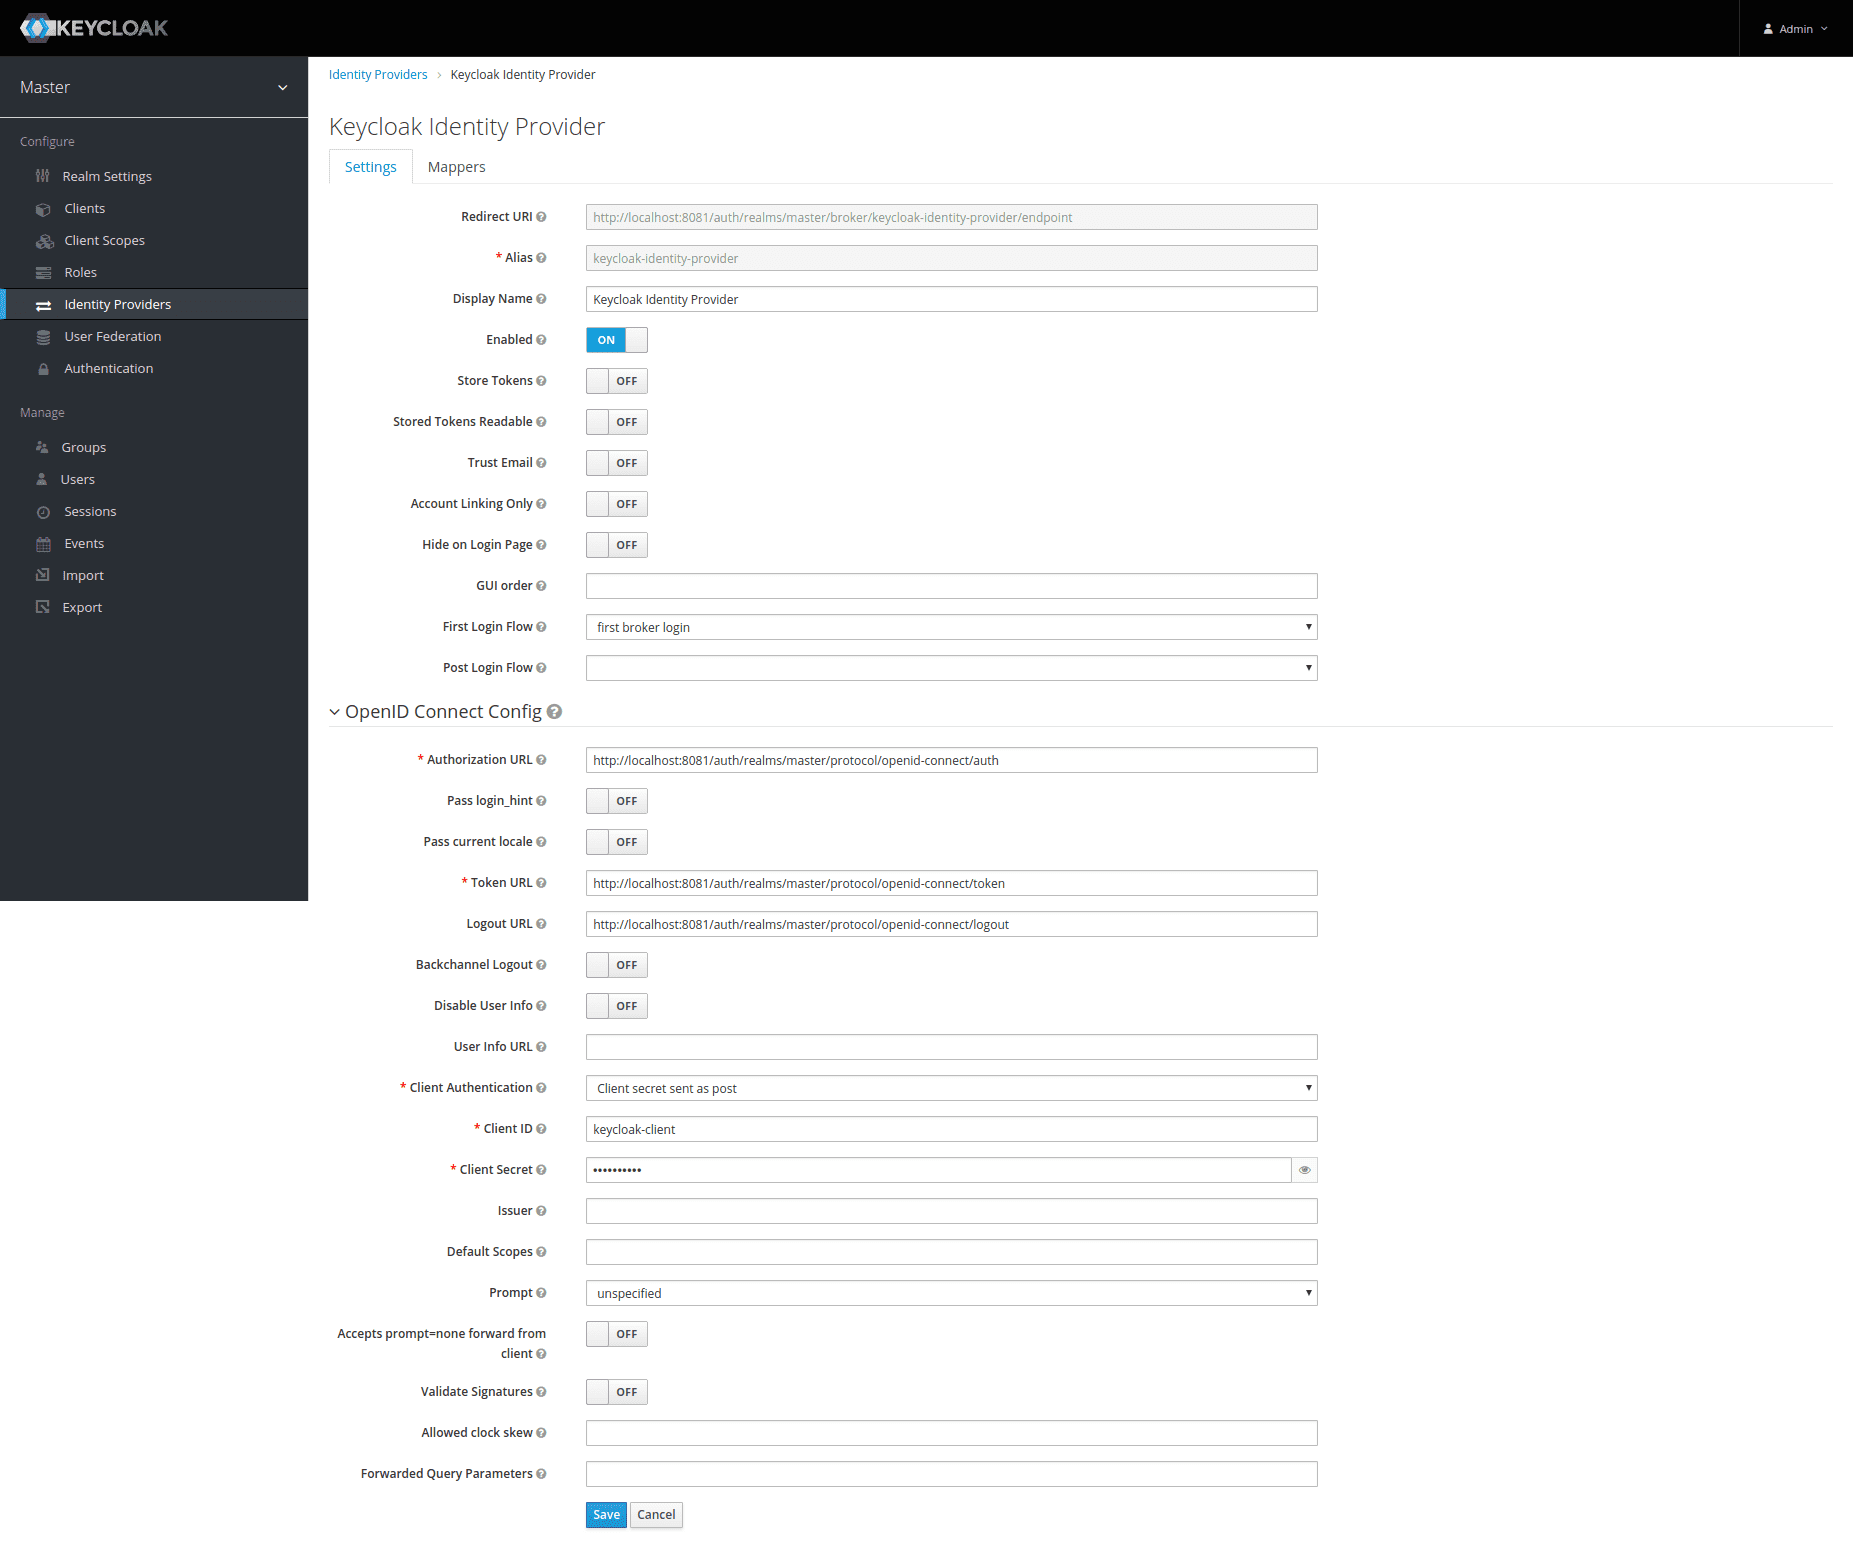
Having done all the mentioned above, you will get a finished configuration on the Keycloak side. But you also need to create a demo user in Keycloak to check the SSO functionality. Go to the Users tab and create a sample user to implement SSO in Liferay 7 and check it afterwards:
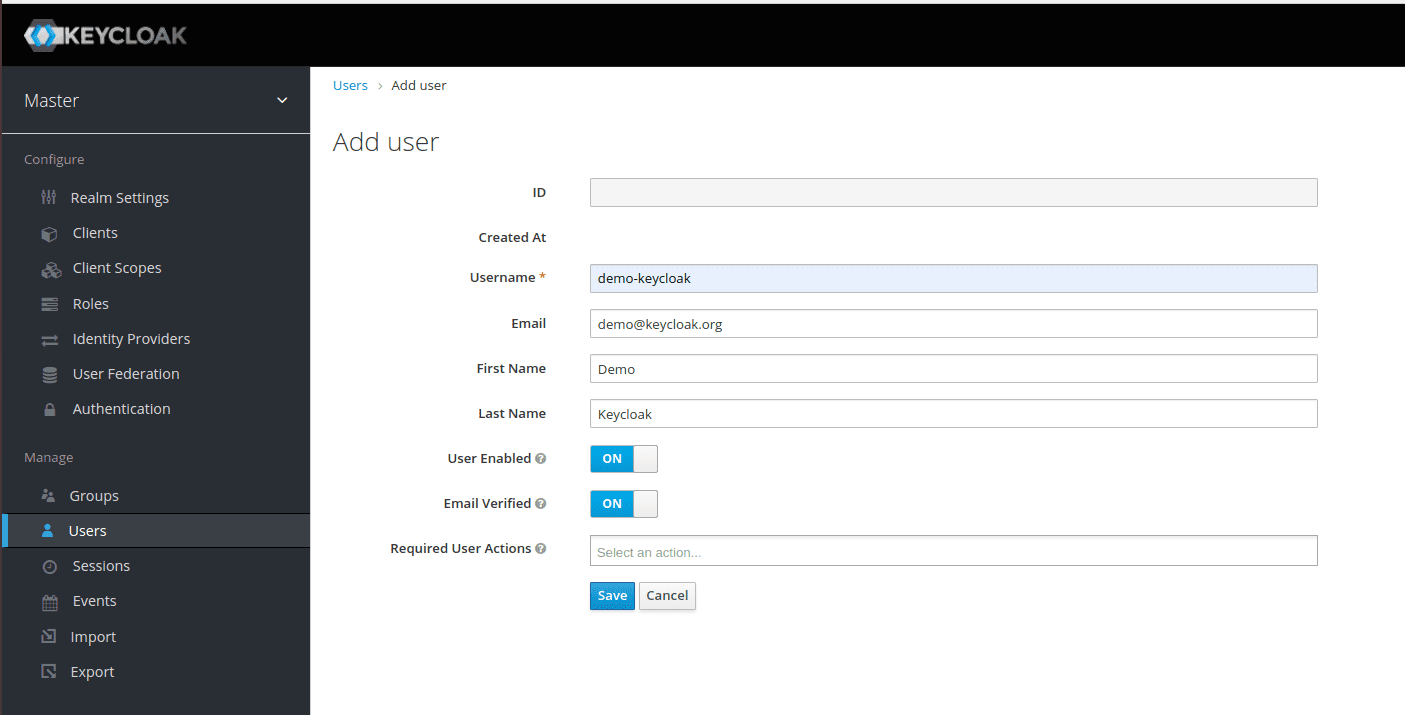
You should set the user password on the Credentials tab:
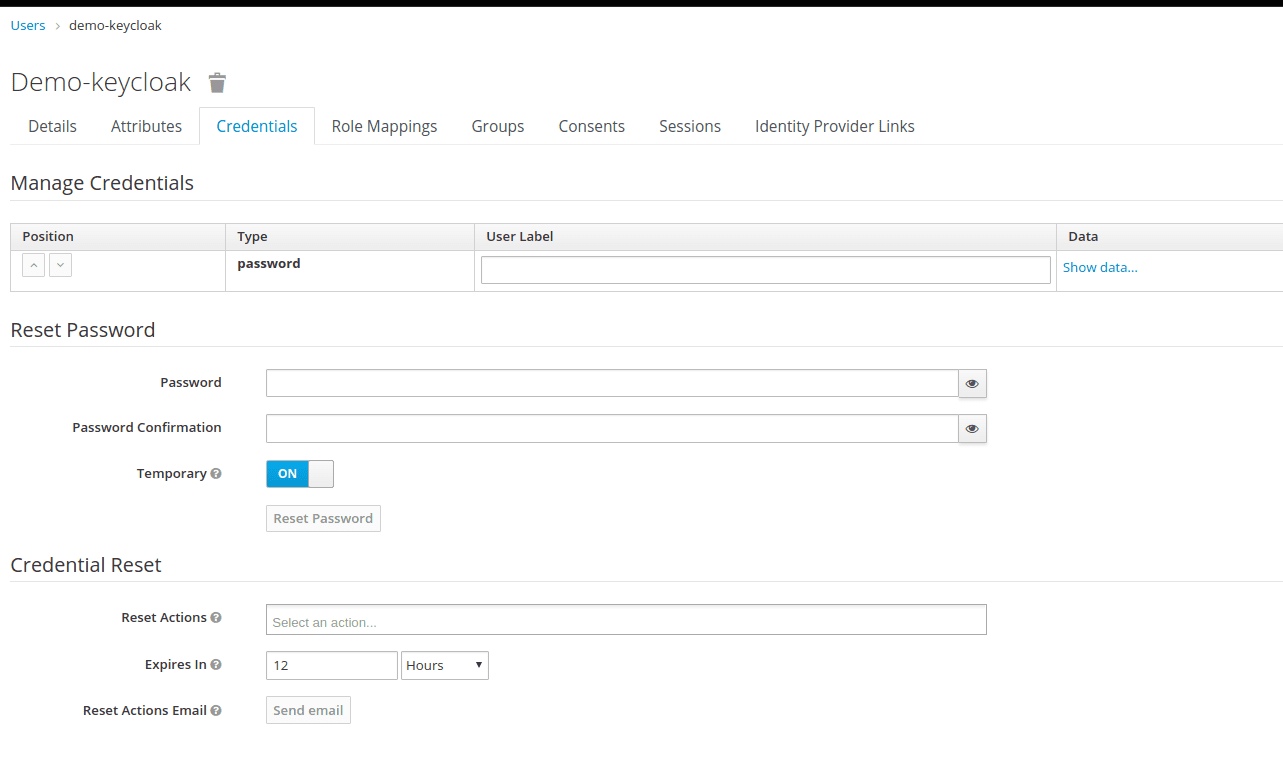
After defining the password, try to sign in to Keycloak under the created user to verify the credentials.
Liferay side
Liferay has a built-in SSO integration. To make the configuration of SSO, you should go to Control Panel -> Configuration -> System Settings -> Security -> SSO as it is shown in the picture below:
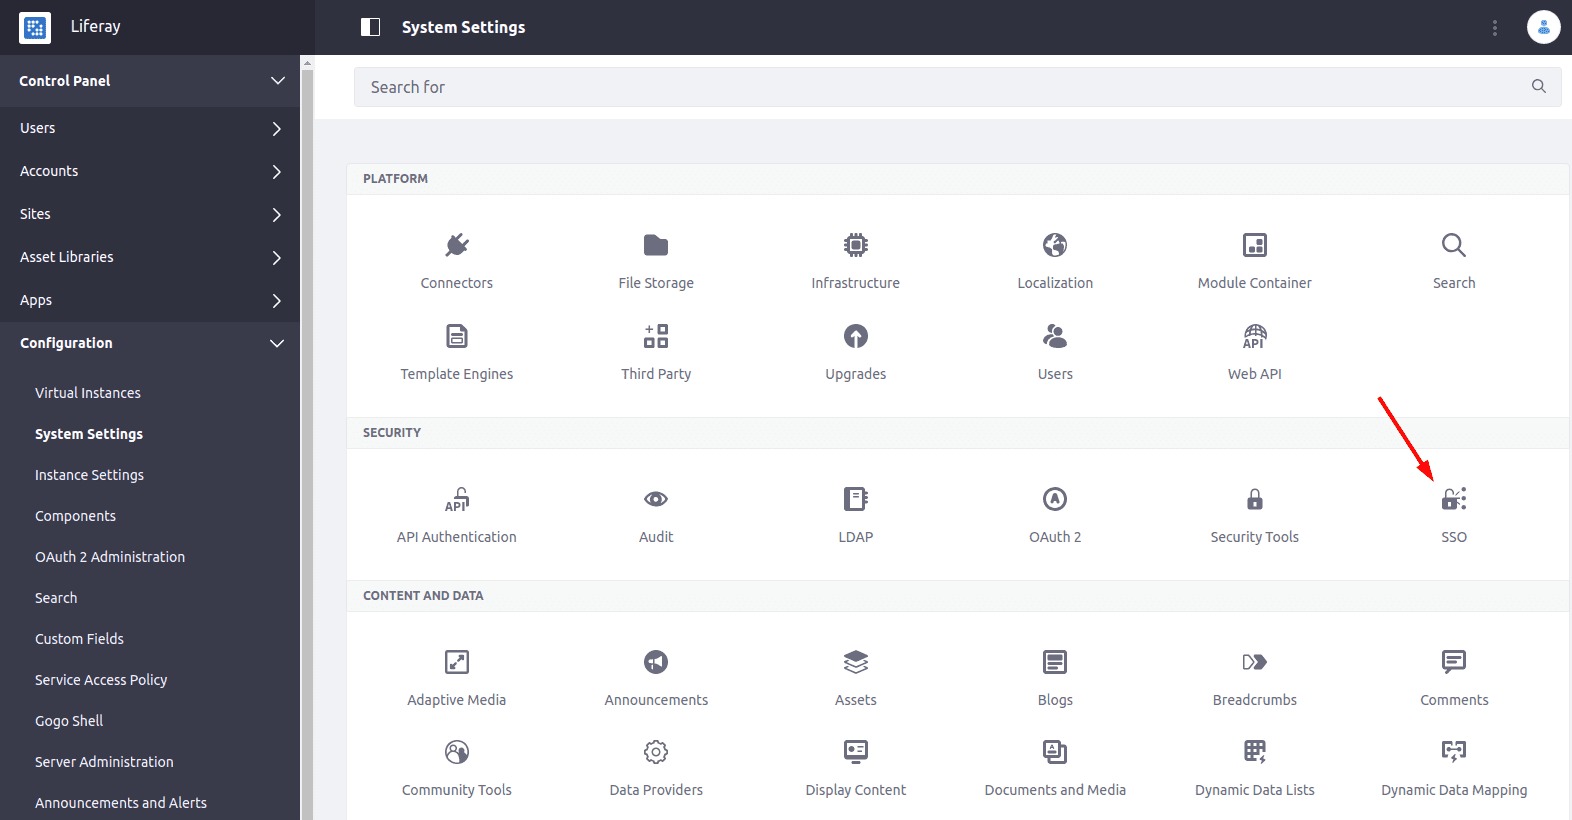
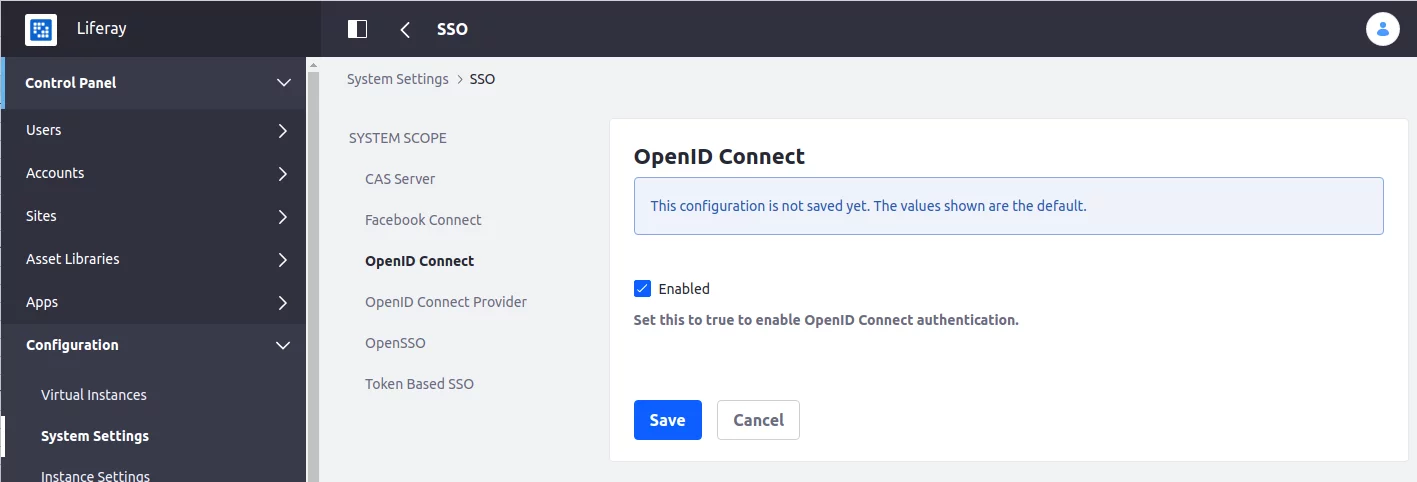
Go to OpenID Connect tab and enable the OpenID Connect authentication:
Then, go to the OpenID Connect Provider tab and create a new OpenID Connect Provider:
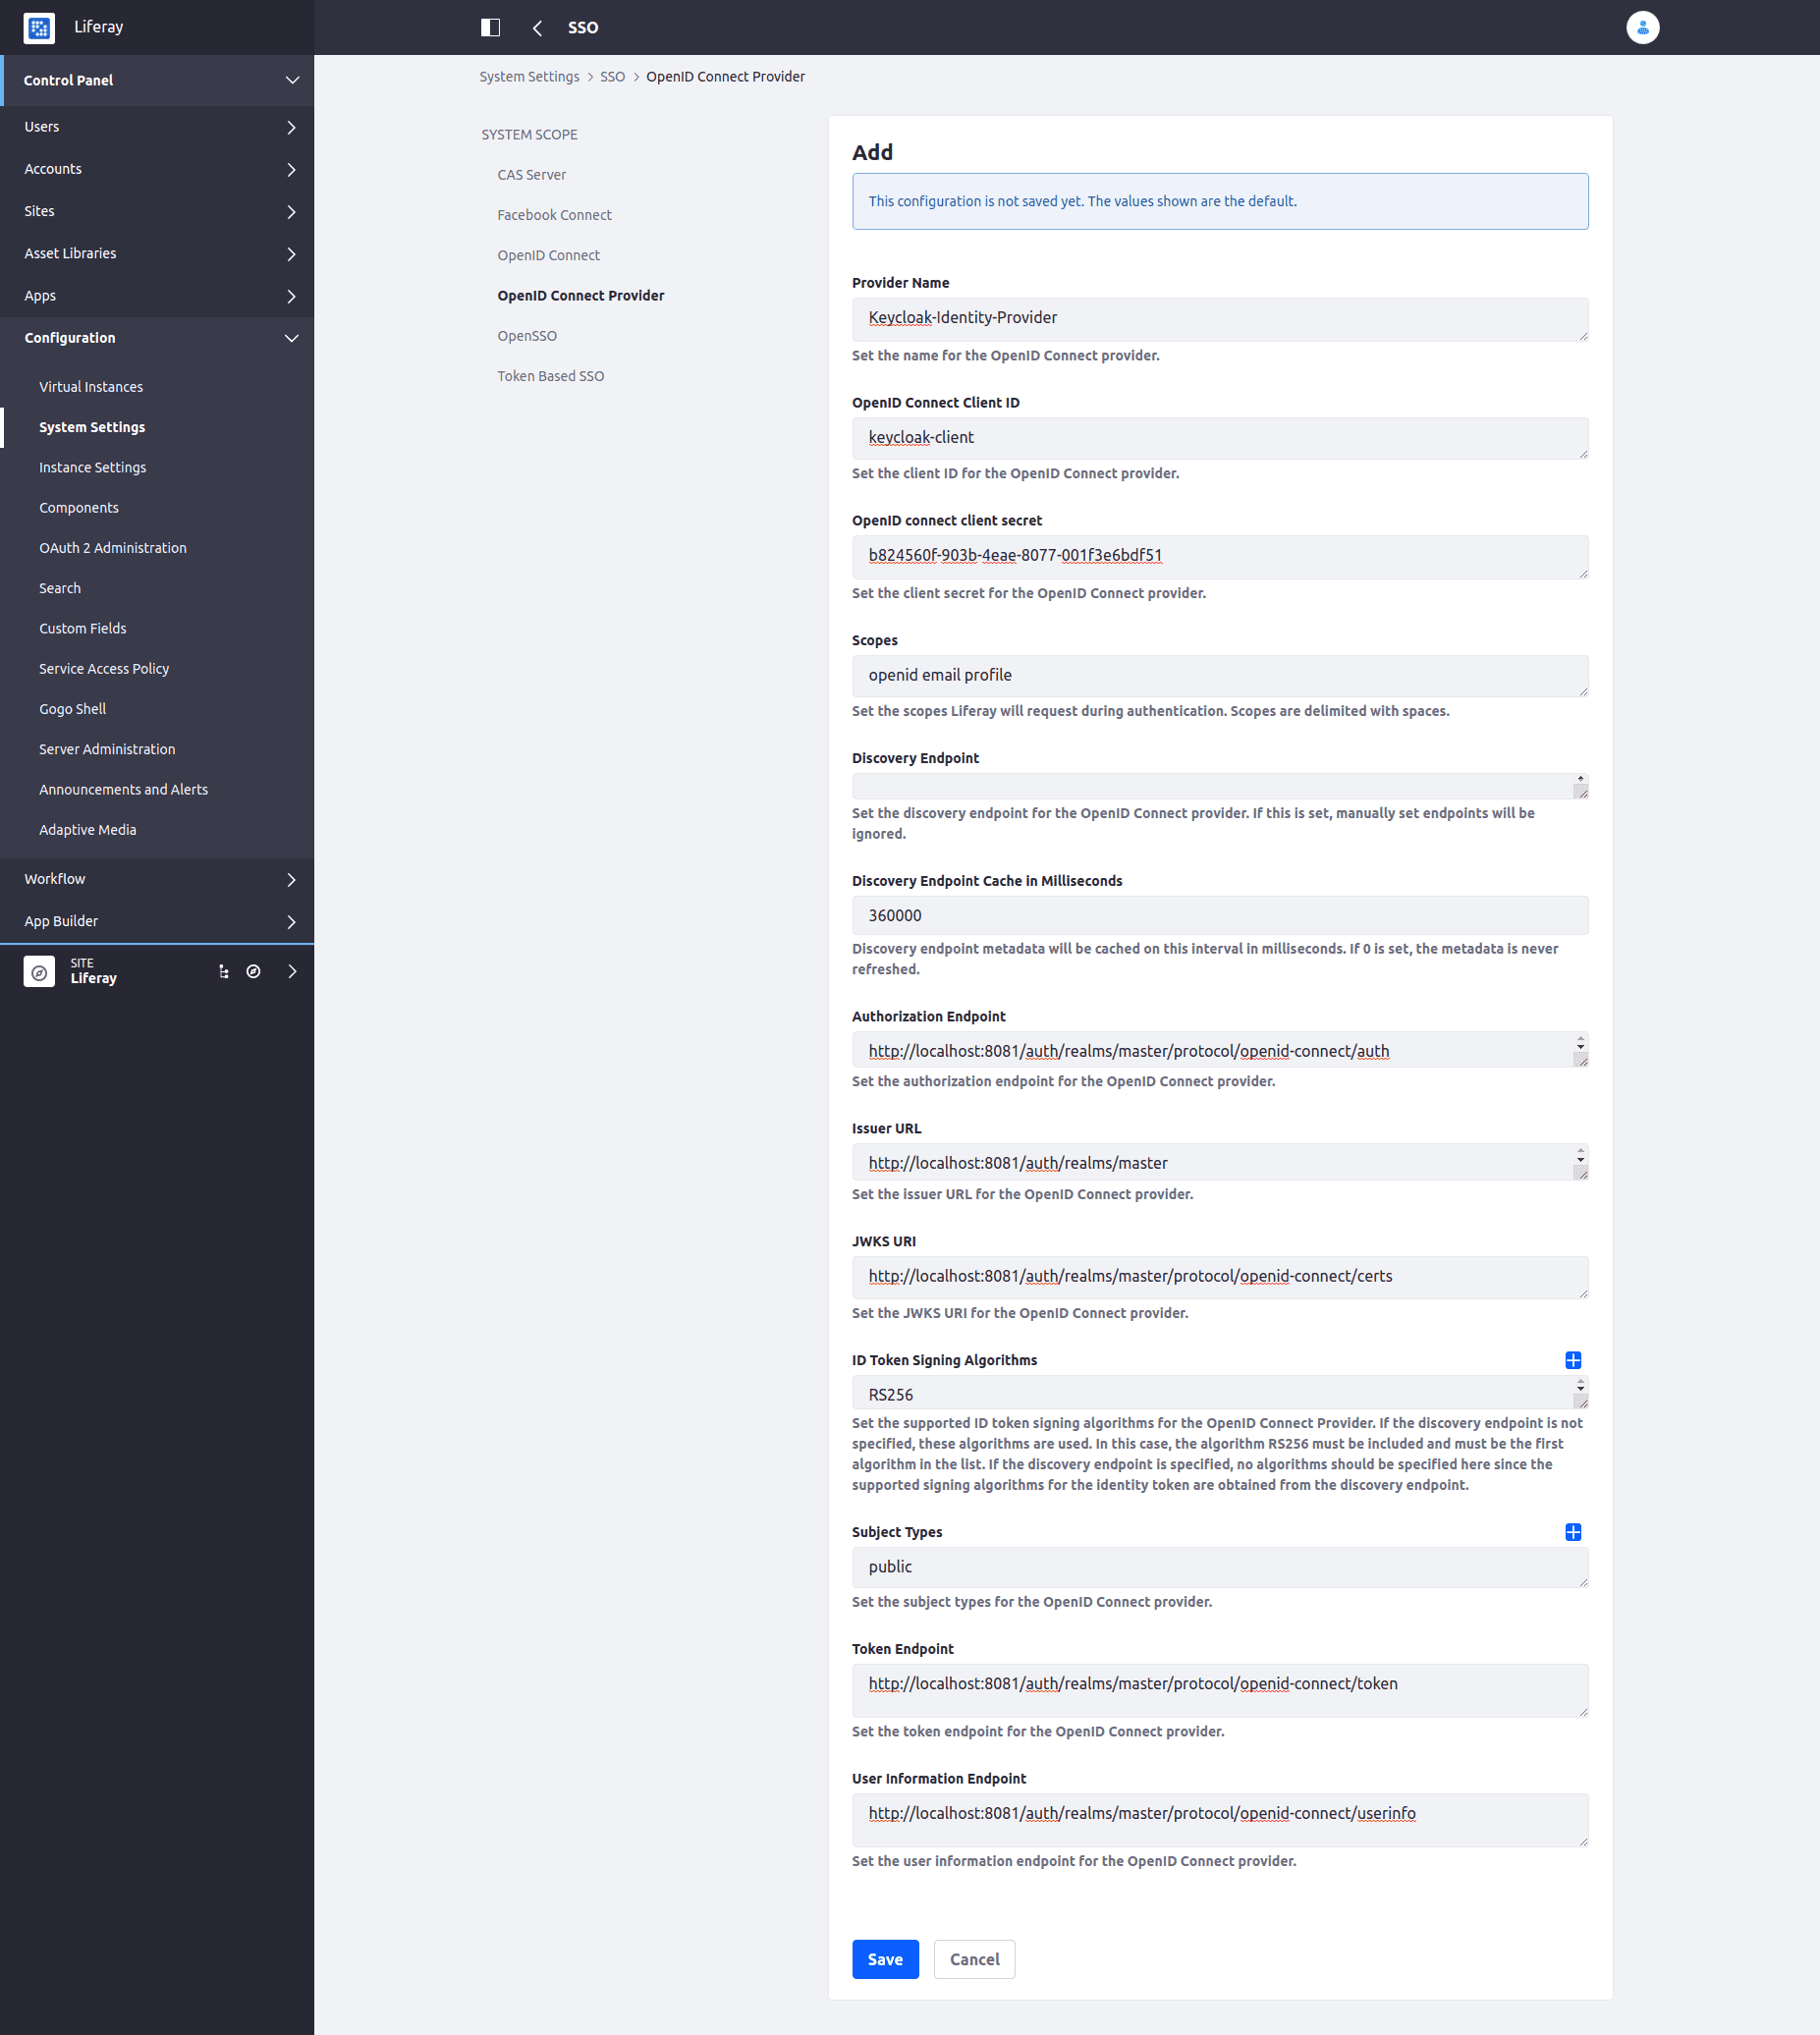
After that, you should define the Provider Name, set the OpenID client ID and secret (see Keycloak client configuration above), define the URLs/endpoints as specified in OpenID Endpoint Configuration JSON. Here are sample configuration values:
| Configuration Key | Configuration Value |
|---|---|
| Provider Name | Keycloak-Identity-Provider |
| OpenID Connect Client ID | keycloak-client |
| OpenID Connect Client Secret | b824560f-903b-4eae-8077-001f3e6bdf51 |
| Scopes | openid email profile |
| Discovery Endpoint | |
| Discovery Endpoint Cache in Milliseconds | 360000 |
| Authorization Endpoint | http://localhost:8081/auth/realms/master/protocol/openid-connect/auth |
| Issuer URL | http://localhost:8081/auth/realms/master |
| JWKS URI | http://localhost:8081/auth/realms/master/protocol/openid-connect/certs |
| ID Token Signing Algorithms | RS256 |
| Subject Types | public |
| Token Endpoint | http://localhost:8081/auth/realms/master/protocol/openid-connect/token |
| User Information Endpoint | http://localhost:8081/auth/realms/master/protocol/openid-connect/userinfo |
Finally, we can check the SSO functionality in action. Click on Sign In link in Liferay, and click on OpenId Connect link:
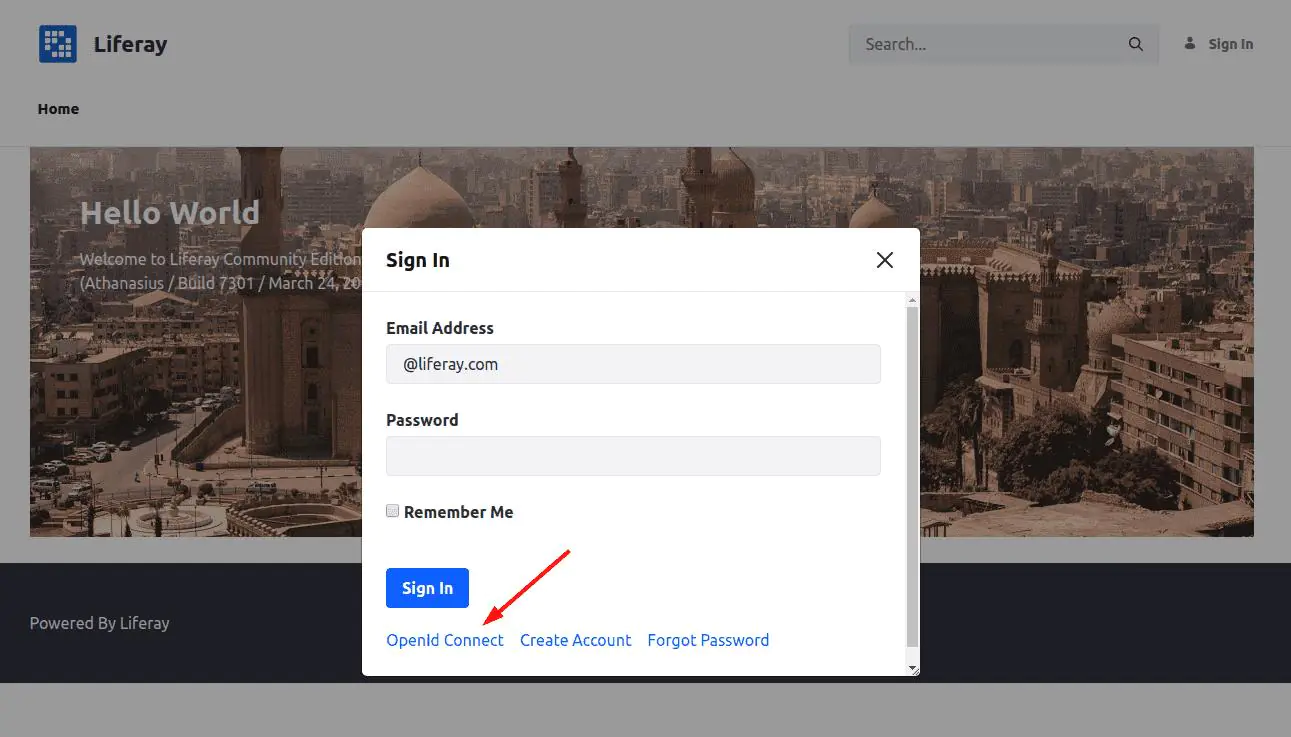
You’ll be shown a list of available OpenId Connect Providers:
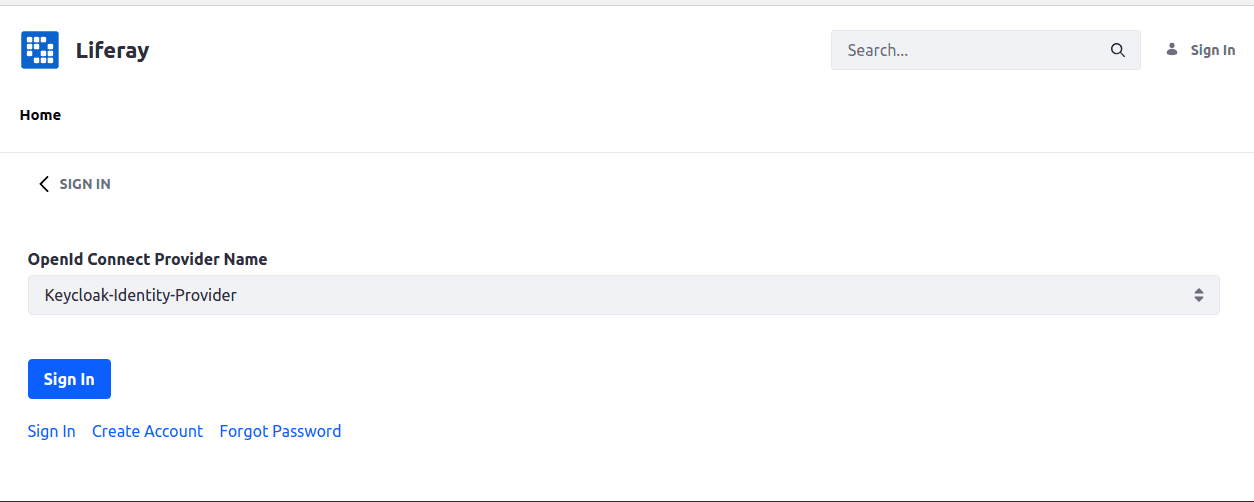
Basically, there should be only one configured above unless anything else is set up in your Liferay environment.
Select the identity provider, configured for Keycloak, and click the Sign In button. You’ll be redirected to the Keycloak Sign In form:
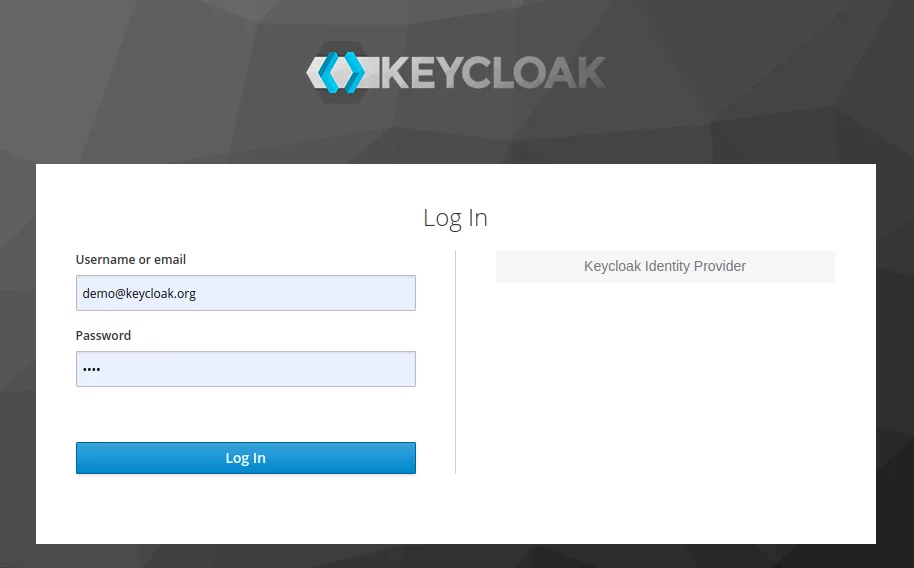
Log in in Keycloak (with the credentials of the created Keycloak user), and you’ll become redirected back to Liferay and logged in there automatically:
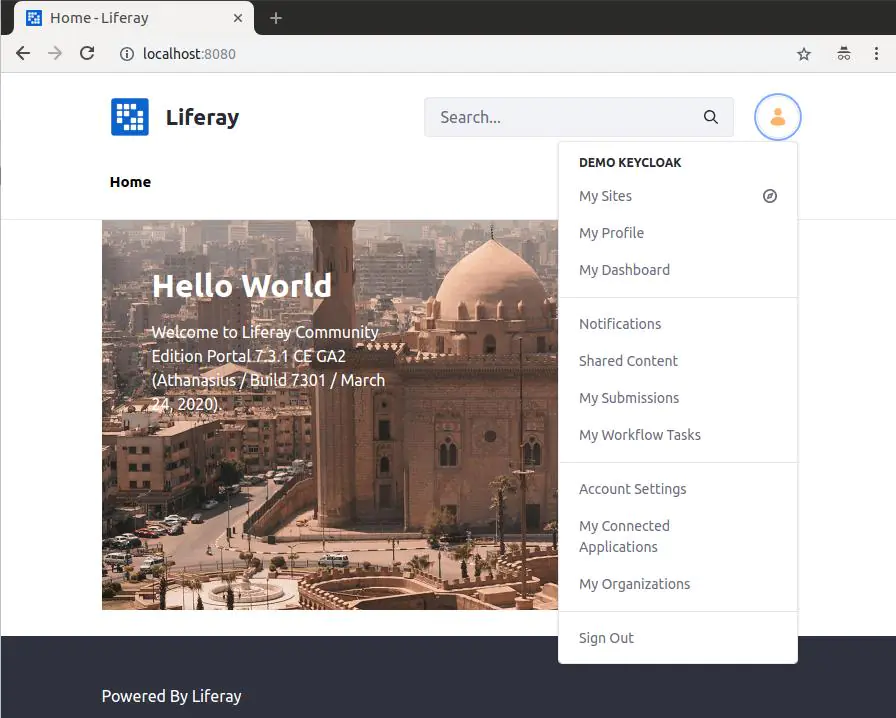
In fact, a new Liferay User is created behind the scene with the same profile values (first name, last name, email, etc.) as the Keycloak user and signed in automatically. Next time when a user signs in with Keycloak, Liferay will recognize that the user is already existing, and will just sign in it.
This is how SSO authorization works for Keycloak with Liferay. Everything is configurable, and no code implementation is required: you just configure client and identity provider in Keycloak, configure provider in Liferay, and everything is working out-of-the-box. But taking a deeper look, you may notice there are a couple of issues with this kind of SSO in Liferay 7 configuration:
- Keycloak is not set as a default authorization point: the user needs to click the OpenId Connect link, then select the OpenId Connect Provider from the list, and only then they are redirected to the Keycloak Sign In form;
- Single Logout (SLO) is not working: when a user is signed out from Liferay – they are not automatically signed out from Keycloak.
The next chapter will show how to overcome these issues and create a full-featured SSO solution with Keycloak and Liferay.
Liferay customization for Keycloak
Even though Liferay SSO integration for Keycloak is configurable, it can be customized from code. Liferay provides a bunch of extension endpoints, which developers may use for customization purposes. In this chapter, we’ll use a servlet filter for automatic redirect to Keycloak during the sign-in process and a logout post action for SLO implementation. Let’s assume that you have already configured Liferay workspace (IDE, project/workspace configuration are not covered in this article). Liferay Gradle workspace for Liferay 7.3.1 GA 2 will be used in the examples below.
Making Keycloak a default authorization endpoint
If SSO authorization with Keycloak is intended to be a default sign-in mechanism, it’s desired to make the automatic redirect to the Keycloak Sign In form once the user hits the Sign In link in Liferay. It will simplify the user experience, as the user does not need to navigate between different sign-in configuration screens: they just should click Sign In, and they will be landed to the Keycloak Sign In form. Unfortunately, this can’t be done in Liferay DXP SSO configuration. But, fortunately, such behavior can be achieved with a custom servlet filter that we’ll cover below.
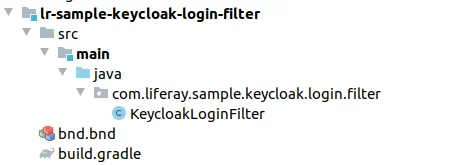
You need to create a new module in your Liferay workspace with a filter class KeycloakLoginFilter.
Module files structure:
bnd.bnd file:
1 2 3 |
Bundle-Name: LR Sample Keycloak Login Filter Bundle-SymbolicName: com.liferay.sample.keycloak.login.filter Bundle-Version: 1.0.0 |
build.gradle file:
1 2 3 |
dependencies {
   compileOnly group: "com.liferay.portal", name: "release.portal.api", version: "7.3.1-ga2-3"
}
|
KeycloakLoginFilter file:
1 2 3 4 5 6 7 8 9 10 11 12 13 14 15 16 17 18 19 20 21 22 23 24 25 26 27 28 29 30 31 32 33 34 35 36 37 38 39 40 41 42 43 44 45 46 47 48 49 50 51 52 53 54 55 56 57 58 59 60 61 62 63 64 65 66 67 68 69 70 |
package com.liferay.sample.keycloak.login.filter; import com.liferay.portal.kernel.log.Log; import com.liferay.portal.kernel.log.LogFactoryUtil; import com.liferay.portal.security.sso.openid.connect.OpenIdConnectProviderRegistry; import com.liferay.portal.security.sso.openid.connect.OpenIdConnectServiceHandler; import org.osgi.service.component.annotations.Component; import org.osgi.service.component.annotations.Reference; import javax.servlet.*; import javax.servlet.http.HttpServletRequest; import javax.servlet.http.HttpServletResponse; import java.io.IOException; import java.util.Collection; @Component( immediate = true, property = { "servlet-context-name=", "servlet-filter-name=Keycloak Login Filter", "url-pattern=/c/portal/login" }, service = Filter.class ) public class KeycloakLoginFilter implements Filter { @Override public void init(FilterConfig filterConfig) { } @SuppressWarnings("unchecked") @Override public void doFilter(ServletRequest servletRequest, ServletResponse servletResponse, FilterChain filterChain) throws IOException, ServletException { try { HttpServletRequest request = (HttpServletRequest) servletRequest; HttpServletResponse response = (HttpServletResponse) servletResponse; //Get OpenId Providers Collection<String> openIdConnectProviderNames = openIdConnectProviderRegistry.getOpenIdConnectProviderNames(); if (openIdConnectProviderNames == null || openIdConnectProviderNames.isEmpty()) { filterChain.doFilter(servletRequest, servletResponse); return; } // Get first OpenID Provider String openIdConnectProviderName = openIdConnectProviderNames.iterator().next(); // Request Provider's authentication openIdConnectServiceHandler.requestAuthentication(openIdConnectProviderName, request, response); } catch (Exception e) { _log.error("Error in KeycloakLoginFilter: " + e.getMessage(), e); } finally { filterChain.doFilter(servletRequest, servletResponse); } } @Override public void destroy() { } @Reference private OpenIdConnectProviderRegistry openIdConnectProviderRegistry; @Reference private OpenIdConnectServiceHandler openIdConnectServiceHandler; private static final Log _log = LogFactoryUtil.getLog(KeycloakLoginFilter.class); } |
This filter intercepts all the requests to /c/portal/login URL (for Liferay Sign In) and performs the OpenId Connect Provider authentication (configured for Keycloak in our case). Deploy the module, and you’ll see that clicking on the Sign In link will redirect users to the Keycloak Sign In form automatically.
Note: with this approach, you may be not able to sign in as a Liferay user anymore (or even as an admin, because the user is redirected to Keycloak automatically, without passing credentials). To make it possible to sign in as Liferay administrator, create a Keycloak user with the same email and just sign in with Keycloak.
SLO implementation
Try to sign out from Liferay, and then try to sign in again. You’ll see that the user will be signed in automatically, without entering the credentials on the Keycloak Sign In form. This happens because log out from Liferay does not imply logging out from Keycloak. Obviously, as we use Keycloak for authorization, we’ll want to use it for logout as well: once a user signs out in Liferay, they should also be signed out in the authorization provider (Keycloak). This is called Single Logout (SLO). But it is not supported in the OOTB SSO configuration in Liferay. However, it can be implemented with a custom post logout action. Now let’s check how to do it.
Create a new module in your Liferay workspace with a KeycloakLogoutPostAction class.
Module files structure:

bnd.bnd file:
1 2 3 |
Bundle-Name: LR Sample Keycloak Logout Event Bundle-SymbolicName: com.liferay.sample.keycloak.logout.action Bundle-Version: 1.0.0 |
build.gradle file:
1 2 3 |
dependencies {
   compileOnly group: "com.liferay.portal", name: "release.portal.api", version: "7.3.1-ga2-3"
}
|
KeycloakLogoutPostAction file:
1 2 3 4 5 6 7 8 9 10 11 12 13 14 15 16 17 18 19 20 21 22 23 24 25 26 27 28 29 30 31 32 33 34 35 36 37 38 39 40 41 42 43 44 45 46 47 48 49 50 51 52 53 54 55 56 57 58 59 60 61 62 63 64 65 66 67 68 69 70 71 72 73 74 75 76 77 78 79 80 |
package com.liferay.sample.keycloak.logout.action; import com.liferay.portal.kernel.events.ActionException; import com.liferay.portal.kernel.events.LifecycleAction; import com.liferay.portal.kernel.events.LifecycleEvent; import com.liferay.portal.kernel.json.JSONFactoryUtil; import com.liferay.portal.kernel.json.JSONObject; import com.liferay.portal.kernel.log.Log; import com.liferay.portal.kernel.log.LogFactoryUtil; import com.liferay.portal.kernel.util.Portal; import com.liferay.portal.kernel.util.PrefsProps; import com.liferay.portal.kernel.util.PropsKeys; import com.liferay.portal.kernel.util.StringUtil; import com.liferay.portal.security.sso.openid.connect.OpenIdConnectProvider; import com.liferay.portal.security.sso.openid.connect.OpenIdConnectProviderRegistry; import org.osgi.service.component.annotations.Component; import org.osgi.service.component.annotations.Reference; import javax.portlet.PortletPreferences; import javax.servlet.http.HttpServletRequest; import javax.servlet.http.HttpServletResponse; import java.util.Collection; @Component( immediate = true, property = "key=logout.events.post", service = LifecycleAction.class ) public class KeycloakLogoutPostAction implements LifecycleAction { @Override public void processLifecycleEvent(LifecycleEvent lifecycleEvent) throws ActionException { try { HttpServletRequest request = lifecycleEvent.getRequest(); HttpServletResponse response = lifecycleEvent.getResponse(); Collection<String> openIdConnectProviderNames = openIdConnectProviderRegistry.getOpenIdConnectProviderNames(); if (openIdConnectProviderNames == null || openIdConnectProviderNames.isEmpty()) { _log.warn("No OpenID Connect Providers found."); return; } String openIdConnectProviderName = openIdConnectProviderNames.iterator().next(); OpenIdConnectProvider openIdConnectProvider = openIdConnectProviderRegistry.getOpenIdConnectProvider(openIdConnectProviderName); Object oidcProviderMetadata = openIdConnectProvider.getOIDCProviderMetadata(); String oidcJson = oidcProviderMetadata.toString(); JSONObject oidcJsonObject = JSONFactoryUtil.createJSONObject(oidcJson); Object authEndpoint = oidcJsonObject.get("authorization_endpoint"); String authEndpointUrl = authEndpoint.toString(); String logoutEndpoint = StringUtil.replaceLast(authEndpointUrl, "/auth", "/logout"); String redirectUri = getRedirectUrl(request); String logoutUrl = logoutEndpoint + "?redirect_uri=" + redirectUri; response.sendRedirect(logoutUrl); } catch (Exception e) { _log.error("Error in KeycloakLogoutPostAction: " + e.getMessage(), e); } } private String getRedirectUrl(HttpServletRequest request) { String portalURL = portal.getPortalURL(request); long companyId = portal.getCompanyId(request); PortletPreferences preferences = prefsProps.getPreferences(companyId); String logoutPath = prefsProps.getString(preferences, PropsKeys.DEFAULT_LOGOUT_PAGE_PATH); return portalURL + logoutPath; } @Reference private Portal portal; @Reference private PrefsProps prefsProps; @Reference private OpenIdConnectProviderRegistry openIdConnectProviderRegistry; private static final Log _log = LogFactoryUtil.getLog(KeycloakLogoutPostAction.class); } |
This action is triggered immediately after logout in Liferay. It takes the OpenId Connect Provider, configured for Keycloak, and performs the request to the Keycloak logout endpoint. After a successful logout, the user is redirected to the pre-configured logout path in Liferay.
Having deployed the module, and you’ll see that SLO is working: once you’re logged out in Liferay, you’re logged out in Keycloak.
Conclusions
Single Sign-on gives a lot of benefits, especially when it comes to a complex system with multiple related, but yet independent subsystems: better user experience and password management, reliable security, and resource savings, etc.
Keycloak is a software product with multiple authentication features, which allows you to set up an SSO provider in a pretty easy and configurable way. Liferay 7 Single Sign-on is supported out-of-the-box, and it can be connected to the Keycloak Provider with the System Settings in a Control Panel.
SSO between Liferay and Keycloak can be implemented just with the configuration on Keycloak and Liferay side. However, if that is not enough, such integration can be customized in code using Liferay’s extension endpoints, like servlet filters and logout post actions for customization of the behavior according to the business needs.
I hope, with the solutions we described in this article, Liferay Keycloak integration has become a bit easier and clearer task for you. If you still have any questions, want to share your own visions, or may search for assistance in Liferay development, don’t think twice to contact our Liferay development team for further collaboration.
Frequently Asked Questions
What is the practical use of SSO?
This will save your time and money for implementation of the authentication functionality in each system as it’s provided by SSO and will simplify the end-user experience because they will have to sign in only once and remember only one username/password pair.
How complex is Liferay-Keycloak integration?
Keycloak integration can be established with a set of configuration steps on both the Liferay and Keycloak sides and may be accomplished during an 8-hour working day. However, if some kind of customization is needed, it will take more time, depending on the requirements.
What are the alternatives for Liferay Keycloak integration?
The main alternatives to Keycloak are Okta, Auth0, ForgeRock, LastPass, OneLogin, etc.


